What is a Gum Former (Healing Abutment)?
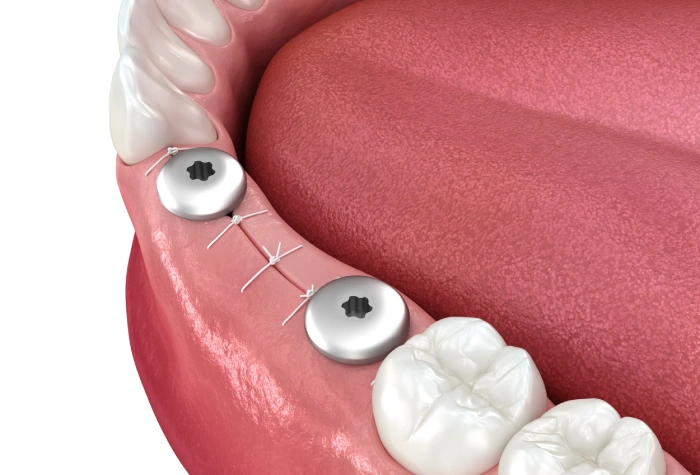
The gum former (healing abutment) is a temporary component installed after the implant has integrated into the jaw. It aids in restoring healthy gum tissue around the implant to support the future prosthesis. The gum former protrudes above the gum line while the soft tissues heal. The gum edge formation process takes about 10-14 days.

The gum former looks like a cap over the gum. It is a screw inserted into the implant to prevent overgrowth. The top part is designed to seamlessly connect with the future prosthesis. After the gum edge is formed, the temporary component is removed and a permanent abutment is installed.
How Does a Healing Abutment Work?
Implantologists often include a gum former in the treatment plan for standard implantation. It's necessary when the implant has fully integrated and a perfect gum contour needs to be created. In some cases, gum formation can be done with a temporary abutment at the discretion of the doctor.
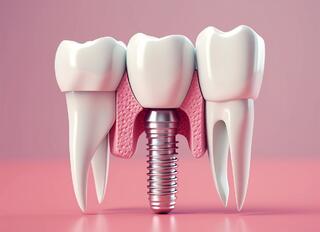
The implant is placed in the bone with a cover, and then the gum is sutured over it. During the healing process, the tissues around the implant can shift or shrink. This can disrupt the initial stability. The component supports the shape of the mucosa, preventing the implant from shifting during healing.
Functions of the Gum Former
The gum former is used for careful healing. It acts as a "template" for the growth of gum tissue around the implant. This contour later supports the prosthesis.
Reasons for using the gum former:
- Protects against infections.
- Provides a base for a crown or bridge.
- Easily removable for cleaning the implantation area during healing.
- Promotes proper healing.
In some cases, the gum former is not required. A direct connection with the prosthesis is immediately established. The decision depends on the implant's position, bone quality, and the patient's overall health.
How Does the Former Differ from the Permanent Abutment?
The healing abutment is used for a limited time while the tissues heal. It prevents the gum from growing into the implant. Typically, this component does not participate in chewing. The lifespan of the healing abutment is 14 days.
The permanent abutment connects the implant to the permanent prosthesis. It is made of titanium or zirconium dioxide to withstand chewing forces. It lasts as long as the implant itself.
Types of Gum Formers
Doctors choose the type of former based on the implant's location and physiological characteristics.
By Construction Type?
- Straight cylindrical type. Used for front teeth. Has a straight cylindrical shape with varying diameters.
- Angled or inclined type. Suitable for molars or in cases of insufficient bone density.
- Custom or adjustable type. Made according to impressions of the patient's mouth for an accurate fit. Matches the contours of the tissues and adjacent teeth.
Size and Shape
- The diameter of the healing abutment matches that of the implant to ensure a proper fit. Diameters range from 2 to 6 mm and more. Incorrect size can lead to implant displacement or improper tissue healing.
- The height determines the profile, i.e., the visible part of the implant. The choice of height depends on the volume of soft tissue and the type of prosthesis. Heights vary from 2 to 10 mm.
Material of the Former
- Titanium – a fully biocompatible, lightweight, and strong alloy.
- Zirconium dioxide. Chosen for front teeth as it does not show through the gum.
- PEEK – a strong and durable conical abutment from Nobel Biocare. Can be matched to the color of adjacent teeth.
When is a Healing Abutment Used?
A healing abutment is installed on the implant during its integration with the bone. It is recommended for:
- Single tooth implantation. Particularly important for shaping the gum around a front tooth.
- Implants under a dental bridge. Necessary to form the gum edge to avoid gaps in the prosthesis.
- Immediately after implantation. Can be placed right after surgery to shorten healing time.
- In cases of insufficient bone volume or inflammation. Used to control the regeneration of new tissue in the affected area.
Contraindications
Implantologists may consider the use of a temporary abutment inappropriate in the following cases:
- In full implantation. An adaptation prosthesis is fixed immediately after surgery.
- In soft tissue pathologies that could hinder proper healing.
- In cases of insufficient bone support. Not recommended when the implant is unstable.
A gum former is not used if complete dentures are planned in cases of multiple tooth loss or complete edentulism. In such cases, a temporary prosthesis is installed that temporarily conceals gum irregularities, so there is no need to maintain their shape.
Advantages of the Gum Former
- Improves tissue healing. Provides a stable base for the prosthesis. The implant looks natural and extends its lifespan.
- Reduces the risk of implant damage. Protects the implant from excessive chewing force. Prevents displacement or damage.
- Simplifies the prosthesis process. The implant does not shift, making the creation of the permanent prosthesis easier.
Steps for Installing the Gum Former
Can be installed immediately after surgery or after the implant has integrated, depending on the protocol.
Immediately After Implantation
Can be used in immediate implantation, for example, when soft tissues are damaged after tooth extraction. An adaptation prosthesis is installed after healing.
Classic Implantation
- First step: Implant insertion, covering with a cap, and suturing the gum.
- Osseointegration period: The implant integrates with the bone (3-6 months).
- Installation of the gum former: Local anesthesia, opening the implant bed, removing the cap, screwing in the screw.
- Suturing to form the gum edge. Removal of incorrectly growing mucosal fragments.
- Installation of the prosthesis.
Is Installation and Wearing Painful?
Local anesthesia is used during surgery. Patients usually tolerate the installation well. Minor bleeding or swelling may occur in the first few days. If symptoms persist, consult a doctor.
Pain can be alleviated with over-the-counter painkillers as recommended by a doctor.
After installation, the soft tissue regeneration and the formation of an even gum edge begin. Then, the former is removed and replaced with an abutment. This is an important intermediate element between the implant and the crown. The permanent prosthesis is then mounted on the abutment.
Doctors assess the tissue formation and healing. Typically, the crown can be installed after 10-14 days. However, more time may be required if the tissues grow significantly or if adjustments are needed.
Complications After the Installation of the Former
After the installation of the former, complications may arise. Some of these may resolve on their own, while others require medical intervention.
| What Not to Worry About | What the Dentist Should Pay Attention To |
|---|---|
|
|
To avoid most complications after installing the former, please follow these care recommendations:
- Regularly brush your teeth with a special brush and toothpaste.
- Do not use mouthwashes unless recommended by a doctor.
- Rinse the oral cavity with a sea salt solution for 3 to 5 days.
- Refrain from smoking for at least 3-4 days after the operation.
- Do not go to the sauna or steam bath until the former is replaced with an abutment.
Recommendations for Using the Former
For successful healing, it is important to follow care and adhere to the dentist's instructions. What to do after installing the former on the implant:
What You Can Do
- Rinse your mouth for the first 3-4 days after installation.
- Follow a gentle diet.
- Attend regular doctor visits.
- Take medications prescribed by your doctor.
- Carefully brush your teeth around the implant.
- Prevent infections in the mouth.
Prohibited
- Chewing hard or sticky food.
- Neglecting oral hygiene.
- Engaging in intense physical activity.
- Consuming alcohol (disrupts the formation of soft tissue).
- Loosening the former.
- Smoking or using tobacco.
How to Care During the Healing Process?
Recommendation after installation:
- Do not eat for 3-4 hours after the procedure.
- Perform oral hygiene only with rinses for the first 3 days.
- Start brushing with a soft toothbrush (replace the old one).
- Avoid hard, sweet, or sticky foods (they can cause complications).
- Take antibacterial medications as prescribed by a doctor.
Frequently Asked Questions
What is a healing abutment and why is it needed?
A healing abutment is a component used in dental implants for shaping the gum tissue around the implant. It is essential for creating a natural gum line for a replacement crown. By helping to shape the tissue, it prevents flat healing of the gum, which would not properly support the new crown.
What are the benefits of using a healing abutment?
Using a healing abutment offers several advantages. It shapes the gum for a natural look of the dental prosthesis, helps prevent infections by acting as a seal against plaque and debris, and ensures that adjacent teeth do not encroach on the implant area during the healing process.
How is a healing abutment installed?
The installation of a healing abutment can be either a one-stage or a two-stage process. In the one-stage procedure, it is installed together with the implant. In the two-stage procedure, it is added after the implant has integrated with the bone, requiring a minor repeat surgery to expose the implant and install the abutment.
What types and materials are used for healing abutments?
Healing abutments come in various types, including standard, straight, angled, and spherical abutments. They are made from materials such as titanium, zirconium dioxide, ceramic, and plastic. Each of them offers unique advantages in terms of cost, aesthetics, and compatibility with human tissue.
Is it safe to reuse healing abutments?
Reusing healing abutments is not advisable. Sterilization may alter their titanium surface, reducing effectiveness, and cleaning can damage the implant screws, making them less reliable.
What care is required after installing a healing abutment?
After installation, it's very important to avoid chewing in the implant area to protect the healing process. The healing abutment and surrounding gum should be gently but thoroughly rinsed, especially after eating. As healing progresses, you can carefully wipe this area and eventually brush your teeth, being careful not to damage the gum tissue and implant.
What should I expect during and after the implantation procedure?
During the implantation procedure, you may feel slight vibration, but no pain due to local anesthesia. After the procedure, there may be some minor discomfort. The implantation process includes stages such as tooth extraction if necessary, bone grafting, placement of the pin and abutment, and then the dental crown. The entire process can take several months, depending on individual healing and the specific procedure used.


